


September 10, 2018
Oven Repair
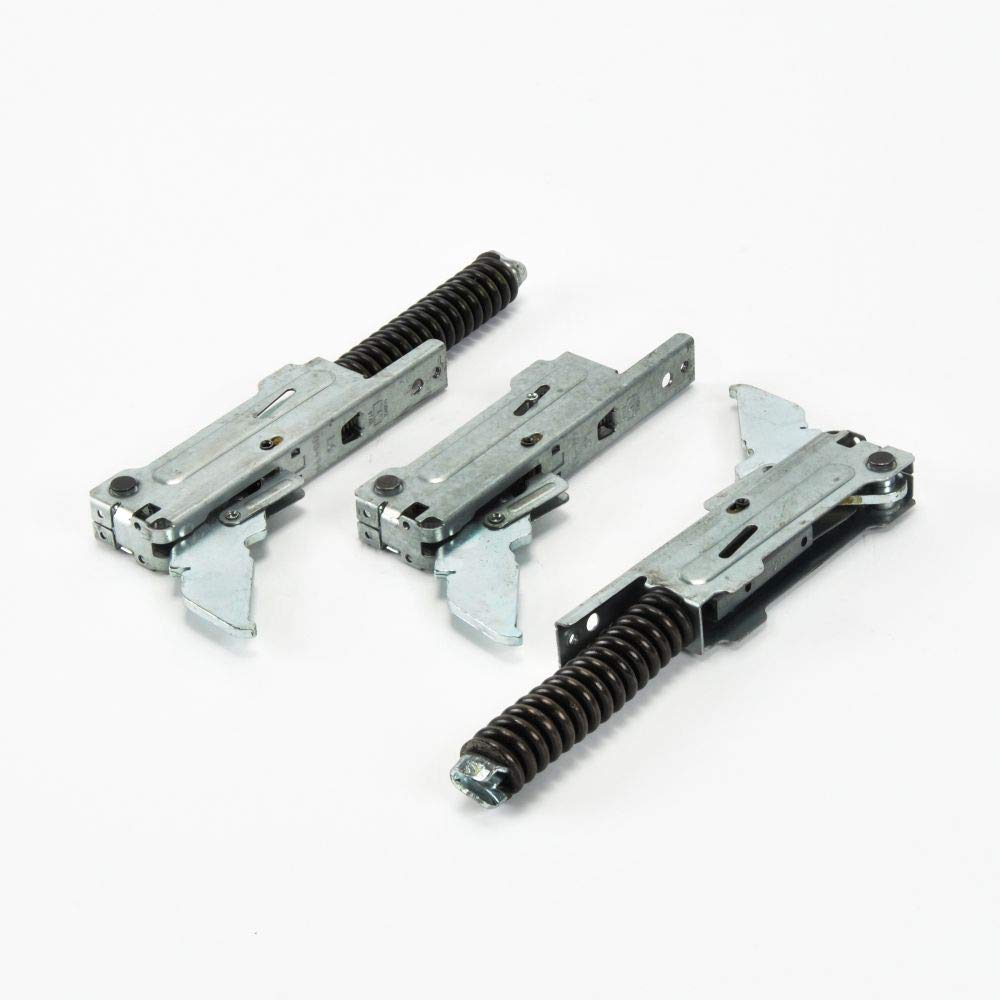
If your oven door isn’t closing correctly, check the hinges. The hinges can get bent or physically damaged over time. This can cause your door to hang crooked, be unevenly supported, or not fully close. Replace the hinges to make your oven safe to use. If you have a Whirlpool model oven, all you have to do is order replacement part #W10347466 and follow these steps:
1. Unplug the oven.
While this appliance repair procedure doesn’t directly involve electrical components, this is always the first safety step. Unplug the oven or flip the matching circuit breaker before you begin.
2. Remove the oven door.
First, fully lower the door. Next, pivot the door hinge clasps forward to release them. These are small arms that lock the hinges in place. Once the hinges are open, close the door to a forty-five-degree angle and firmly grab the sides of the door. Then lift it up off the body of the oven and pull the door forward so the hinges are free of the cavities.
Set the door front side down on a flat work surface protected by a towel.
3. Dismantle the oven door.
Remove the screws around the perimeter edge of the oven door. First, remove the four screws on the door hinges. Next remove the six screws, or three on each vertical side of the door, holding the inner and outer panel. Take care while removing the screws at the top corners because they hold the handle and trim assembly in place. Set those parts aside when they come loose. Then remove the screw at the bottom of the edging.
Then remove the trim from around the edge of the door. Pry the bottom of the side trim free with a flathead screwdriver and the pop each piece free. Set them aside.
Pull the hinges out of the way and lift the inner panel free of the hinges. Tilt the bottom free first so you can swing the inner panel free of the top mounting tabs. Set it aside.
4. Replace the oven door hinges.
Under the inner panel you removed, you’ll see a metal inner panel. Lift up the bottom right corner of the panel so you can pull the hinge free. Repeat with the lower left corner.
Before you install the replacement pieces, you have to identify which hinge you should use. The replacement hinge kit comes with three varieties of hinge for different models. These include one without a spring, one with a spring that is made from stainless steel (denoted by a yellow stripe down the hinge), and a hinge with a spring and no other features. The third is the most commonly used hinge type.
Lift up the metal inner plate and set each hinge on the left and right channels.
5. Reassemble the oven door.
Start by reinstalling the inner panel. Align the top of the inner panel with the tabs on the metal panel. Swing the panel down until it is flush with the metal panel. Adjust the insulation and inner metal panel so the insulation doesn’t hang out over the edges. Also manually adjust the hinge so it slides through the slot in the inner panel. Make sure both hinges slide through. Then secure each hinge with the two bottom screws that thread through the outer panel.
Next, you will be adding the two top screws for each hinge. In order to make sure the holes in the inner panel and the hinges line up, press down on the inner panel. Then replace the screws one hinge at a time.
After that, reattach the central screw on the bottom trim piece.
Then attach the side trim pieces. Start on one side. Locate the end of the trim with the small locking pin. You’ll need to rotate the trim to slide that locking pin into the hole on the outside edge of the outer panel. Then push the trim flush with the side of the door and snap it into the additional locking tab. Repeat with the trim on the other side of the door. Once both trim pieces are in place, shift the door glass to make sure it’s centered against both trim edges.
Once the trim is secure, you will be adding back the remainder of the screws that secure the inner panel to the oven door above the screws. Start at the bottom corner above the right screw. Look through the hole and see if the inner panel and the inner metal panel are aligned. If they aren’t, reach through the bottom of the door to slightly adjust the metal panel until the holes align. Then thread the screw into place. Do the same with the bottom of the left side of the door before continuing up each side of the inner panel.
As you screw the inner panel into place, the top of the inner panel may be too far away from the interior metal panel. Carefully squeeze the two panels closer together so the short screws can catch a grip on the threads of the inner metal panel.
After that, reassemble the door handle trim. Make sure the left and right edges slip over the previous trim edges you attached. The oven door’s glass should also line up with a central tab. Once it’s in place, reattach the two corner screws to hold it in place.
6. Reattach the door.
On the edge of the two hinges’ arms, there is a small locking tab facing up. On the bottom near the L-bend in the hinge is a small notch. Hold the door at a forty-five-degree angle and insert the hinges into the cavities on either side of the oven. Make sure both hinges are inserted into the hinge cavities far enough for them to catch on the small notch and the locking tab. You should feel it settle into place as you lower the door.
Once you feel them catch, lower the door fully. Snap both hinge clasps to lock the hinges into place. Then close the door.
Go to Paradise Appliance Service for more appliance repair procedures and troubleshooting tips.
(323) 284-6780Give us a call!
May. 06, 2024
LG Washer LE Error Code Explained

May. 06, 2024
5 Reasons Your Oven Is Not Heating Up

May. 06, 2024
What Temperature Should a Freezer Be Set At?

Apr. 09, 2024
How to Fix the Whirlpool Washer F9 E1 Error Code

Apr. 09, 2024
How to Solve Frigidaire Dishwasher Lights Blinking

Apr. 09, 2024
Resolving the LG Washer UE Error Code (3 Easy Fixes)

Mar. 06, 2024
Replacing an Over-the-Range Microwave with a Range Hood

Mar. 06, 2024
How to Get Burnt Smell Out of Microwave (In 2 Easy Steps)

Mar. 06, 2024
7 Reasons Why Your Bosch Ice Maker Is Not Working

Feb. 05, 2024
Why Does Your Self-Cleaning Oven Smell?

Feb. 05, 2024
Why Is Your Whirlpool Cabrio Washer Not Spinning?

Jan. 03, 2024
Why Does My Refrigerator Make Noise?

Jan. 03, 2024
Troubleshooting the F2 Error Code on a Whirlpool Oven

Jan. 03, 2024
Rust Inside Microwave: Causes, Fixes, and Prevention Tips

Dec. 11, 2023