


August 20, 2018
Dishwasher Repair
Troubleshooting a Dishwasher
Although a dishwasher comes equipped with many different components that work in conjunction with each other, when something goes wrong, it can usually be narrowed down to one of five reasons.
Faulty Water Inlet Valve
Your home water supply connects to the dishwasher water inlet valve and controls the amount of water that is needed during various times of operation. Sometimes a screen will get clogged and sometimes the valve will not open. And sometimes you will need to replace the valve.
Malfunctioning Wash Arm
Wash arms are propellers that come with prefabricated holes that release the correct amount of water pressure designed for maximum cleaning efficiency. If any of these holes become clogged with food particles, your machine will not be at its best performance and some or all of your dishes will not be clean. Use a toothpick or some small picking device to remove any debris present.
But this doesn’t mean that you should start prewashing your dishes before you place them in the dishwasher. Get rid of the big stuff but leave the rest. The dishwasher needs the food particles to achieve a proper ph balance. And if you live in an area that has high amounts of minerals in the water, that, too, could clog the wash arm jets. Soak the wash arms in vinegar and baking soda overnight to remove mineral deposits. Pour some vinegar into the detergent dispenser and run an empty load once a month to maintain clean wash arms.
Broken Wash Arm
Water flows through a water distribution tube to the wash arm. Sometimes the tube can become obstructed with food debris and result in a lack of water jetting through the wash arms. But sometimes a utensil may slip away from where you placed it and become lodged during a wash or rinse cycle and prevent the wash arm from moving. As a result, the wash arm may become damaged and should be replaced.
Impeller Problem
The circulation pump motor relies on an impeller to move water through the wash arm. If the impeller becomes damaged, then not enough pressure is present to force water to and through the wash arm. Unfortunately, you will need to purchase a new circulation pump if the impeller is a part of the assembly. If the impeller is separate from the pump motor, great! You will only need to replace the impeller.
Defective Circulation Pump
When you start the dishwasher, you should hear the pump motor turn on. If it does not make a sound or hums after the dishwasher has filled the motor has burned out and should be replaced.
Whirlpool Dishwasher Leaving Dishes Dirty
Okay, now we’re going to peer a bit deeper into the dishwasher. You will learn what a chopper assembly is, what it does, and how to remove and clean it. You will also learn why your dishwasher is cleaning the dishes in a substandard manner and what you can do about it.
The following guide is representative of Whirlpool and Maytag Dishwashers.
Tools Needed
- Philips screwdriver
- #20 Torx screwdriver or bit
- #15 Torx screwdriver or bit
- Bent needle nose pliers
- Shop vacuum
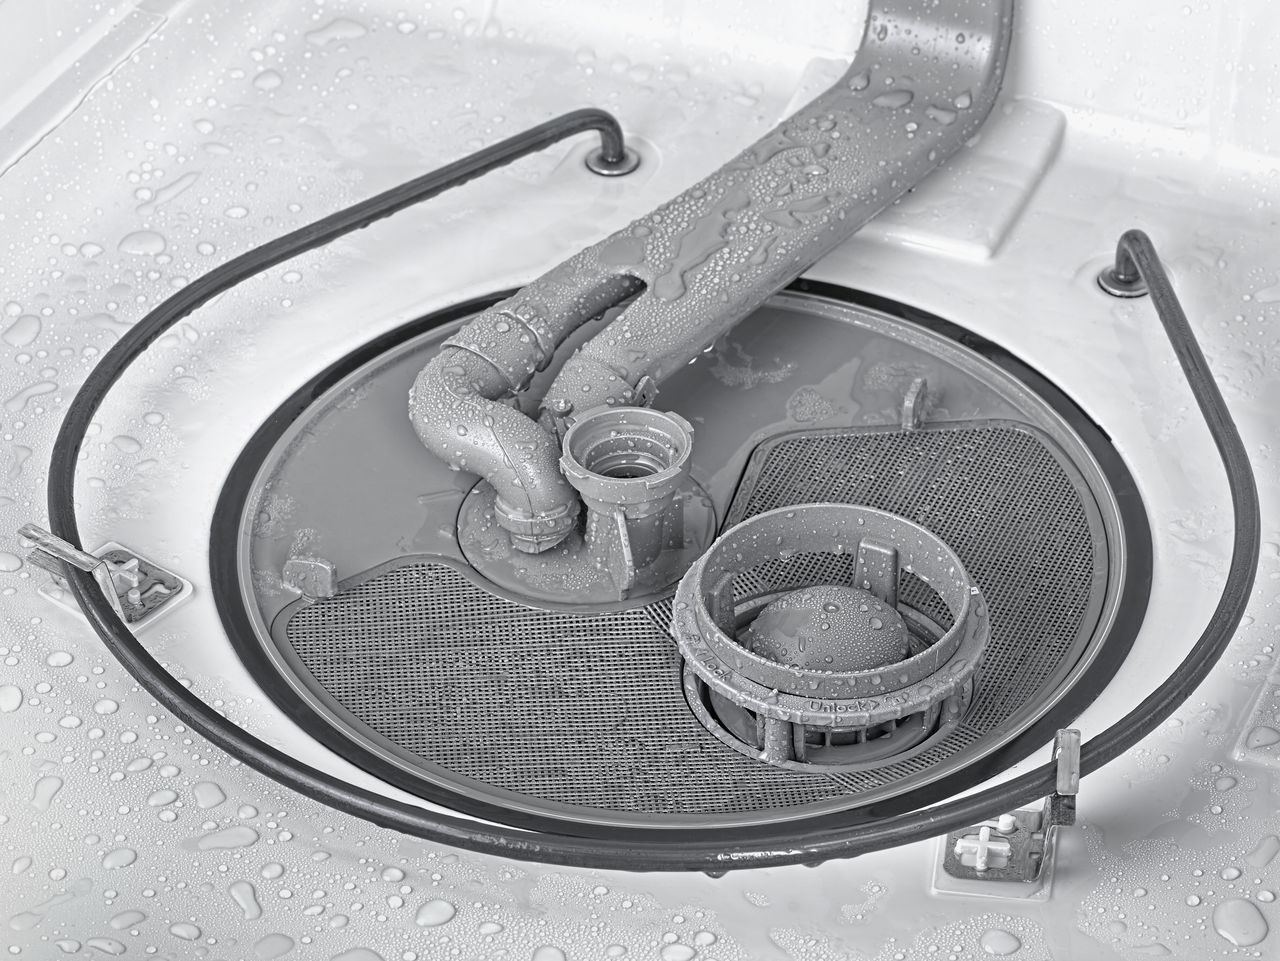
How to Access the Sump Area
- Remove the lower rack to begin access to the sump.
- Remove the upper rack to gain as much access as possible. Remove two stops located at the end of each glide and slide the rack out.
- Remove the lower spray arm by twisting in a clockwise fashion a lock nut that holds the arm in place.
- Reach into the dishwasher to release a tab that holds the remainder of the wash arm assembly to the water distribution tube. Once the tab is released, manipulate and twist the assembly from the tube.
- With a #20 Torx screwdriver or bit if you’re using a drill, remove the four Torx screws that secure the coarse filter in place. Carefully remove the filter as these components are fragile and you don’t want to break anything.
- Use the #15 Torx bit to remove one screw that holds the chopper assembly cover in place. Remove the cover and set aside.
Pro Tip: Place screws and small parts in a container so you can locate them later.
Over time a lot of food debris collects in the chopper assembly and sump area and as a matter of maintenance should be cleaned periodically. The debris will not allow enough water to flow to the wash arm and that is usually the main reason the dishes are not being cleaned satisfactorily.
- Use a shop vacuum to completely vac out all food particles and debris.
- Next to the drain hole is a slot that contains a check valve. Use your pliers to remove the check valve and inspect for damage. If it passes inspection, carefully return it to its slot.
- Remove the water distribution tube. It is secured with two Philips screws.
- Inspect and clean the third level spinner. Replace it if it’s damaged in any way.
- Return the water distribution tube to its place and secure.
- Reach into the chopper area and remove the chopper screen and blade assembly. Careful of sharp edges.
- Inspect the blade and screen. Remove any debris and thoroughly clean the assembly so that water can flow freely to the spray arms.
- Observe the two indentations on the screen of the chopper assembly. These correspond to the indentations on the sump assembly.
- Use the needle nose pliers to carefully return the chopper assembly. Ensure the gear matches and engages with the motor. Use the indentations on the side of the screen as a guide for doing this correctly. Turn the macerator blade to make sure you got it back in place.
- Reinstall the chopper cover. Secure the #15 screw with the #15 Torx screwdriver.
- Reinstall the coarse filter with the #20 Torx screwdriver.
- Replace wash arms and racks.
Pro Tip: Be careful not to overtighten screws that secure plastic parts as eventually the threads will wear down or the plastic may break.
This concludes this tutorial. If your dishwasher is still spitting out mediocre work then it may be time to consult with a professional appliance repair company.
(323) 284-6780Give us a call!

Apr. 09, 2024
How to Fix the Whirlpool Washer F9 E1 Error Code

Apr. 09, 2024
How to Solve Frigidaire Dishwasher Lights Blinking

Apr. 09, 2024
Resolving the LG Washer UE Error Code (3 Easy Fixes)

Mar. 06, 2024
Replacing an Over-the-Range Microwave with a Range Hood

Mar. 06, 2024
How to Get Burnt Smell Out of Microwave (In 2 Easy Steps)

Mar. 06, 2024
7 Reasons Why Your Bosch Ice Maker Is Not Working

Feb. 05, 2024
Why Does Your Self-Cleaning Oven Smell?

Feb. 05, 2024
Why Is Your Whirlpool Cabrio Washer Not Spinning?

Jan. 03, 2024
Why Does My Refrigerator Make Noise?

Jan. 03, 2024
Troubleshooting the F2 Error Code on a Whirlpool Oven

Jan. 03, 2024
Rust Inside Microwave: Causes, Fixes, and Prevention Tips

Dec. 11, 2023
4 Ways to Get Smell Out of Dishwasher

Dec. 11, 2023
7 Steps to Fix a Whirlpool Oven Not Heating

Dec. 11, 2023
What to Do When Your Washing Machine Smells Like Rotten Eggs

Nov. 06, 2023