


August 9, 2019
Dryer Repair
When a dryer gets old, it eventually starts to rattle. You may be familiar with the continual sound of an unreasonably noisy dryer. Maybe you’re hearing thumps, scraping, or just a constant clatter that never stops. Even worse, you’re 100% sure that no change or house keys are lost in there. Instead, the sound is coming from the dryer itself.
Fortunately, you don’t need to just live with a noisy dryer if you’re not ready to buy a new one. Dryers get noisy for a reason, usually that some of the more wearable parts have become worn. One such part that gets noisy at it wears out is the dryer drum glides. These are special glide pieces that help the drum turn smoothly without making noise. So, naturally, when the glides wear out the dryer gets noisy.
So today, we’re here to help you replace your own dryer drum glides at home assuming that your dryer shares the most common design.
Getting Started
1. Gather Your Materials
The first step is to get together all the right materials. Start by researching the type of drum glides you need to complete the replacement. Use your dryer’s make and model to find a catalog of replacement parts or glides that are compatible with your model of dryer.
The supplies you will need:
- Compatible dryer drum glide replacements
- Phillip’s head screwdriver
- Flathead screwdriver
- Putty Knife
2. Unplug the Dryer
For safety, always unplug your dryer before working on it. No matter what you’re investigating, it’s better for you and the dryer if no live electricity is involved. Unplugging your dryer makes it impossible to short-out the dryer or to get electrocuted.
Carefully disconnect your dryer’s power cable from the wall socket without touching the prongs. You may have to pull hard, as dryer plugs tend to be large and heavy.
Open the Top
3. Clean the Lint Trap
Because we are opening the dryer, your next step is to clean the lint trap. Pull the filter and clear any old lint. Then set the filter aside.
4. Detach the Lint Duct Housing
With the lint filter removed, you can reach the screws that connect the lint duct housing. This is the piece you just removed the lint filter from. Use the correct screwdriver to remove the four screws around the lint duct housing. Carefully set these screws aside and label them if necessary.
5. Release the Dryer Top Clips
Dryer tops are a lot like car hoods. There’s usually a pair of clips that must be released before the dryer top can swing up. This is easiest to do with a putty knife but a sturdy flathead screwdriver can do as well. A few dryer models do not have clips and can simply be pried open.
Slide your putty knife into the seam under the dryer top. Slide it along the edge until you hit a clip. Press with the putty knife to release the clip, then do the same with the matching clip on the other side. There should be an audible clip release.
6. Prop the Dryer Top Open
With the clips released, pry the dryer top open from the front. Once it comes loose, swing it carefully backward and prop it against the wall behind your dryer.
Remove the Front Panel
7. Unplug the Door Sensor
Look down at the top of the dryer’s front panel. You will see a small electrical clip which connects the panel to the door sensor. Carefully squeeze the clip where appropriate and pull to release. This will allow you to pull the front of the dryer free without wires as a tether.
8. Pull Out the Dryer Front Panel
There are two screws holding the dryer front panel to the rest of the dryer body. Unscrew and remove them. Set the screws aside and label them if necessary.
Then lift the front of the dryer up and away from the dryer body. It will pull out of its slot at the bottom and come away. Turn the inside of the front panel to face you and place it next to the dryer.
Replace the Drum Glides
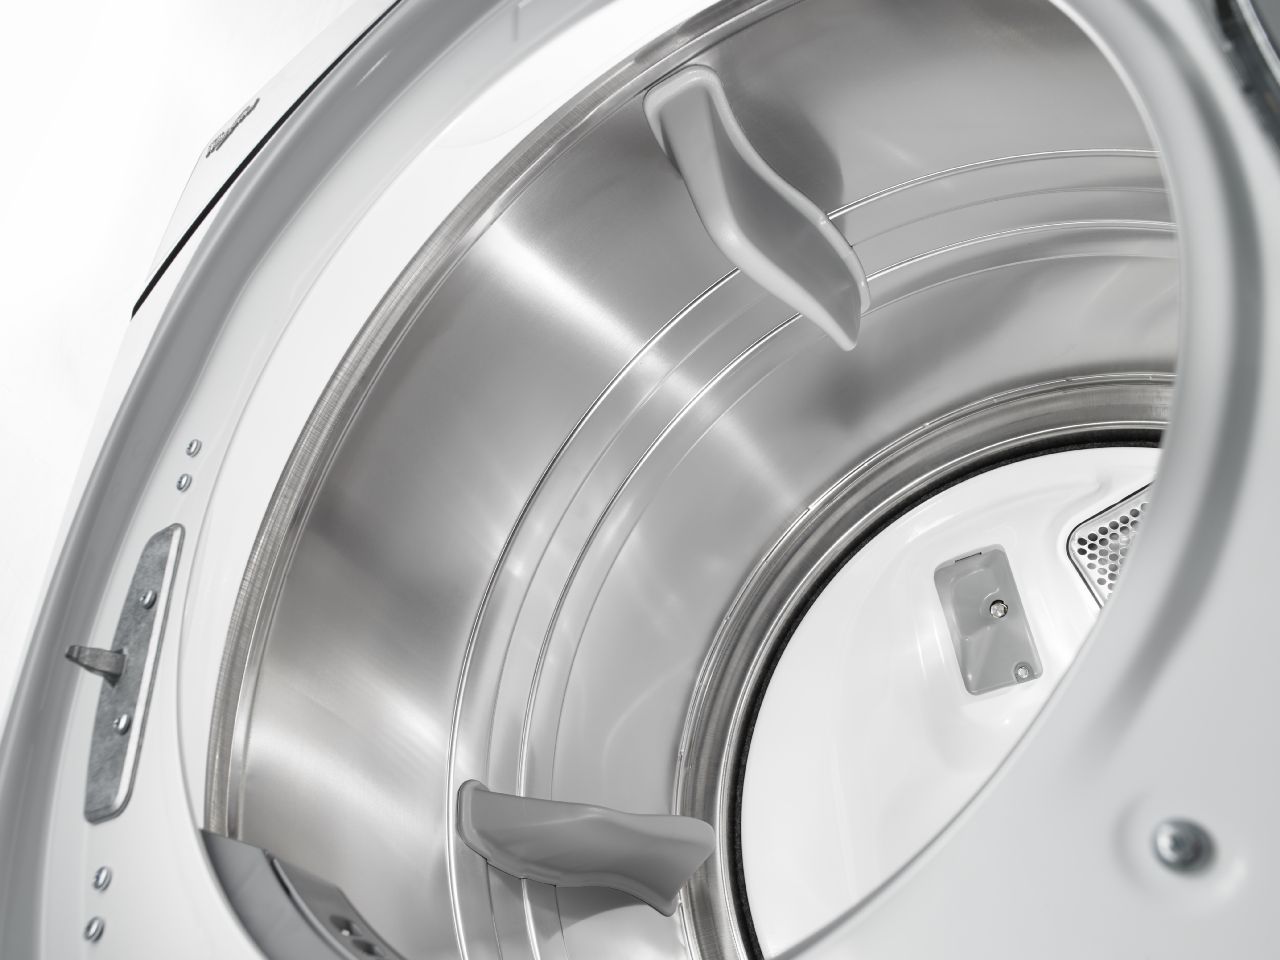
9. Find Your Drum Glides
Now locate your drum glides. In some dryer models, the glides are just inside the door and the drum fits into them when the dryer is put together. In other models, the glides are around the door side of the drum itself. Wherever your dryer model keeps its glides, find them and take a close look at how they are attached and how they are supposed to work.
10. Replace the Felt Drum Glide
If your dryer uses felt drum glides, find yours. Remove it by peeling the old worn felt away from its glue and the mounting surface. Use your putty knife to remove stubborn felt and then peel away old glue.
Apply several lines of high-heat resistant glue onto the felt mounting surface and carefully place your new felt drum glide. Use a clamp or clamps to hold it in place for 30 minutes as the glue dries.
11. Remove Plastic Glide Bolts or Clips
Next, look closely at how the old plastic glides are attached. Often, they will have bolts or screws that need to be removed. Do so and carefully hold onto the screws and any mounting gear that was removed to take out the old glides. There may also be a clipping mechanism to release the glides in addition or instead.
12. Extract Plastic Glides
With the bolts and clips removed, pull the old plastic glides out of position and throw them away.
13. Install New Plastic Glides
Carefully install your replacement plastic glides exactly as the old glides were installed. Use your set-aside screws to attach the glides to their mounts and press firmly until all clips clamp shut.
Reassemble the Dryer
14. Return the Dryer Front Panel
With the glides replaced, you’re ready to close the dryer back up. Retrace your steps and put the dryer back together starting with the front dryer panel.
Lift the panel and set it into the slots at the bottom of the dryer housing. Pus inward while dropping the panel to slide it into place. Replace the set-aside front panel screws and twist them firmly into place.
15. Swing the Dryer Top Closed
Gingerly pull the top of the dryer list back down over the body. Set it over the corners and then push it firmly back into position. You will feel the dryer top slot over the rest of the dryer body.
16. Reattach the Lint Duct Housing
In the top of the dryer, the holes for the lint duct housing will have realigned. Replace the removed screws now and twist them firmly into place.
17. Return the Lint Filter
Retrieve the lint filter that you set aside at the beginning and slide it into the lint duct housing.
Final Check
18. Test Your Dryer
Finally, you are ready to plug your dryer back in and test to see if your noise problem is solved. Firmly slot the power plug back into place and dry some towels. If your dryer is no longer noisy, then congratulate yourself on a repair well done.
(323) 284-6780Give us a call!

Apr. 09, 2024
How to Fix the Whirlpool Washer F9 E1 Error Code

Apr. 09, 2024
How to Solve Frigidaire Dishwasher Lights Blinking

Apr. 09, 2024
Resolving the LG Washer UE Error Code (3 Easy Fixes)

Mar. 06, 2024
Replacing an Over-the-Range Microwave with a Range Hood

Mar. 06, 2024
How to Get Burnt Smell Out of Microwave (In 2 Easy Steps)

Mar. 06, 2024
7 Reasons Why Your Bosch Ice Maker Is Not Working

Feb. 05, 2024
Why Does Your Self-Cleaning Oven Smell?

Feb. 05, 2024
Why Is Your Whirlpool Cabrio Washer Not Spinning?

Jan. 03, 2024
Why Does My Refrigerator Make Noise?

Jan. 03, 2024
Troubleshooting the F2 Error Code on a Whirlpool Oven

Jan. 03, 2024
Rust Inside Microwave: Causes, Fixes, and Prevention Tips

Dec. 11, 2023
4 Ways to Get Smell Out of Dishwasher

Dec. 11, 2023
7 Steps to Fix a Whirlpool Oven Not Heating

Dec. 11, 2023
What to Do When Your Washing Machine Smells Like Rotten Eggs

Nov. 06, 2023